Thursday, August 30, 2012

Leopard Blues...

What I used:
Kat Von D True Romance Pigments in Johnette & Torment
(both of these are on sale right now at Sephora HERE)
Urban Decay Eyeshadow Primer Potion
Urban Decay Transforming Potion 
Physicians formula eye definer automatic eye pencil in black
& Rimmel Lash Stiletto in black.

First I applied the shadow primer over my entire lid.
I took the pencil and drew out some half moon shapes all over the lid. Make sure to draw one curve over the other. Basically you want a circle or oval shape that is missing either the sides or bottom.
I took the Kat Von D True Romance Pigment in Johnette using a shadow brush and applied it all over the lid avoiding the center of the ovals.
Next I used the Transforming potion with the Kat Von D True Romance pigment in Torment. Just lightly dip the end of the wide brush into the shadow. This makes it into more of an eyeliner so it goes on more even.
Dab this inside the black eyeliner lines.
Then I went back over my lines to assure they were dark enough.
I added the liner to my waterline and finished with the Rimmel Lash Stiletto mascara.


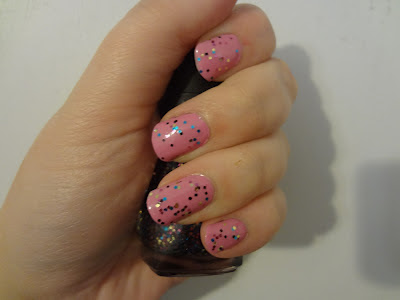
Trust Fund Baby nails...

Ok so for this I used 2 coats Essie Cascade cool on the bottom. Then I added 2 coats Wet N Wild Spoiled Polish in Trust Fund Baby.
Here is the Essie cascade Cool alone...
And this is after just one coat of Trust Fund baby...

Wednesday, August 29, 2012

Awesome Nail Art Giveaway from Peice Of Pie

Until Sept 12 enter to win one of 3 prizes from Bundle Monster. Prizes include 1 stamping plate set and 2 sets of 50 fimo canes. Enter HERE

Chance to win your very own bottle of Floam!

Until Sept. 1 you have a chance to win either Ninja Polish floam or Depend Holographic Sand Grey. Head over to Lauriestrodes Fun With Nails to sign up HERE.

Tuesday, August 28, 2012

Layered Glitter Nails

So for these I had on 3 coats of China Glaze Lubu heels already. This is a black polish with a  super fine red glitter. On top of that I added 2 coats of Wet N Wild spoiled line polish in Shuffle The deck. The polish has a super wide brush for picking up the glitter however it took me a little work to get the glitter from the brush to my nails. Dry time was pretty fast though. I think this 2 just look fab together though :)

Kat Von D True Romance Pigment in Torment

So today I wore the Kat Von D True Romance Pigment in Torment. Seriously with a name like that I was bound to love it! It is a highly pigmented light shimmer purple. As always with this line it wore all day without creasing or fading. Best part is right now you can get this color at Sephora.com for a steal at $7! They also have Johnette on sale which is a blue color. I will try and post something with that color in the next few days since you know I got that one too. If you wanna scoop these up while they are on sale you can find em HERE

Saturday, August 25, 2012

China Glaze: Lubu Heels...


So I totally have a new favorite polish right now and I wanna cry cause it doesn't photograph well :( China Glaze Lubu Heels is a black base with a superfine red glitter. I am wearing it here in 3 coats but if you want a lighter look a single coat would go perfect over a bright red polish!

$75 Jolica Fair Trade Giveaway from I Heart Giveaways...


Here is your Chance to win a $75 gift card from Jolica Fair trade. Head over to I Heart Giveaways to enter.


Only a week left for this awesome giveaway!

The Giveaway ends 9.01.2012 and is OPEN Internationally!
 
Enter Giveaway at Gnarly Gnails

Smashbox Kiss & Tell eyeshadow...

So for this look I used the Smashbox Kiss & Tell Palette. These don't have individual names so here is the palette to follow...

I started on my lids using the purple shade (4th from the left)
In the crease I used the hot pink (2nd from the left)
Then on my brow bone at well as over the entire look I used the shimmery pink. (1st on the left.)

To finish this look I used a Morbid cream Eyeliner in Hot Pink & Rimmel Mascara in black.

Thursday, August 23, 2012

Mini Monsters mani....


My Supplies...
From left to right:
Stripe Rite nail art in White
Ornaments nail art in black
Unforgettable Moments clear coat
Brash Nail Polish in Luminous Lime
Recollections Flocking powder in Lime
At the top is an eyeshadow brush by E.L.F.

First off lemme start by saying I am NOT and artist. This was just a fun idea from a friend and I ran with it. Please don't post negative or rude comments. This blog is just about fun little tips you can try at home. No one needs to be criticized here.

Ok so I started with my clear coat and let it dry.
Then I layered on 1 coat of the Brash Polish in luminous Lime...
After drying I  used the stripe Rite polish for what would be the whites of the eyes. Think of either to vertical ovals or you could even use a 8.
I wasnt going for super clean here since I knew I would be adding other layers to cover any mistakes...
Once that was dry I used my black Nail art pen to outline the eyes. Then I added a "pupil" in the center of each eye. Again they dont have to be perfect as the flocking powder will cover a lot of mistakes...
Now using the Brash Luminous Lime polish apply around the outside of the black outline on the eyes. DO THIS ONLY ONE NAIL AT A TIME. You can use a nail art brush for this as well.
While the polish is still wet sprinkle on a generous amount of the flocking powder.
Best you do this over something as the powder is quite messy.
Press down slightly on the powder to get it to stick best to the polish.
Using the eyeshadow brush (or any make up brush) Lightly brush away the excess powder on the sides of you nails as well as over your "eyes". You can brush VERY gently over the flocking powder as well of you think it is to thick. Just keep in mind that the polish underneath is still wet!
Repeat adding the 2nd coat of color, Adding Flocking Powder, & Brushing Away excess on each nail.
Do NOT use a top coat of you will lose the "fuzzy" effect.
In the end you will have a funny, unique mani that will last a few days.

Tuesday, August 21, 2012

Metal Bruises Eye Makeup Look...

So for this look I used a palette called Morbid Metals I got at Hot Topic. It features a total of 6 shimmery dark shadows. On the inside corner of my lid I used a burgundy shadow. I followed that with a dark purple in the center. Then I used black for the outside corner of my Eyelids. I swept the lightest shade, Which is a shimmery silver over my brow bone.  Instead of eyeliner on this one I used lipliner. I don't know about you all but I have never found a good red eyeliner. Guess most people dont want to intentionally have red eyes LOL. So I used a Maybelline Great Wear Budge-Proof Lipliner in wine. Then as always I finished the look with a black Mascara. this time it is Rimmel Volume Flash. 
BUT...The weird shadow that tends to fall over the outside edge of my eyes if from my eyebrow rings. No matter which room I take photos in it always shows up so just ignore it please. It's not a flash in the makeup just freaky little me LOL.

Poetic Purples Eye Makeup look...

For this look I used the Kat Von D True Romance palette Poetica. This set comes with 8 shadows and one Autograph Pencil in Black. (Eyeliner). This set is available at Sephora. Because of the fact these shadows are HIGHLY pigmented I did NOT start with a primer. I also used the shadow dry instead of wet. The colors always look true to shade anyway. These wear all day without creasing and show very little wear after 16 hours. I started with Shiba on the inside corner of my lids. In the center I used babe. then the outside of my lids I have used Wonderland. On my lids as well as over the very top of the shadow I used You Alone. I did stick with the Autograph Pencil that cane with the set in black. I though I was not going to like this as the pencil seemed a little soft and oily. However this too wore well all day. I finished the look simple with a Rimmel Volume Flash Mascara in Black.

Kat Von D Wonderchild...

Ok so I am sure by now everyone had noticed I am obsessed with Kat on D eyeshadow. This time I decided to give the polish a whirl. This one is called Wonderchild and I got it at Sephora. The polish was a little on the thin side so I did have to use a total of 3 coats to get to this color. Dry time was reasonable. The smell was not to pleasant but it was worth it. The purple color is a great shade to begin with but the over the top shimmer definitely put this one is the win category for me.  

Friday, August 17, 2012

Ciate Caviar Copycat look...

So I am sure plenty of you Polish addicts out there have thought about buying the Ciate Caviar look from Sephora right? Well this is my mock version. The entire look cost me waaaaay less than buying a kit from Sephora and I have far more color options at my disposal.

So I started off with a simple Sally Girl mini polish in an awesome silver color...

I applied one coat of the polish and let it dry fully.
I applied a second coat of polish and waited til it was a bit Tacky.
I added a third coat to my right pinky and IMMEDIATELY added the micro beads to the wet nail.
Once my nail was covered in the beads I shook the excess off over a plate.
Then I pressed down on the beads just to make sure they were well embedded in the polish.
I repeated this step with all my nails. Apply the beads after each nail is painted so they stick.
I used Recollections Micro beads in Silver which I got from Michaels at a steal for 3.99 a bottle.
And just for added durability I added a thick top coat to ensure the beads stay longer.

I am so loving this look. I think maybe next time I should use a black polish for my base and try to get a "studded" Appearance.

Wednesday, August 15, 2012

Free Bobble Head

Go here to claim your free Bobblehead. Many to choose from! I am sure these will go fast!
Claim your bobble head HERE

Awesome Indie Polish Giveaway from Lace & Lacquers

Check out this awesome giveaway from Lace & Lacquers. There are a total of 3 different prizes you could win! 
Enter HERE.
Ends 8/31

Awesome Indie Polish Giveaway from 9ml Universe

Check out this awesome giveaway from 9ml Universe! She is giving away 3 Purple Professional polishes. 
Fine the giveaway HERE. Ends August 31st.

Deborah Lippmann Giveaway from Addict for Dramatics

Addict for Dramatics is Giving away a bottle of Happy Birthday by Deborah Lippmann.
You can enter to win it HERE.

Pixel's Polish 100 follower giveaway

Awesome Giveaway at Pixel's Polish.
You can enter HERE.

Awesome Jewelry Giveway to enter

Awesome Giveaway now open from The Review Wire. They are giving away a $50 Gift Certificate to Sodderbug Jewelry. You can enter this giveaway HERE. Ends 8/17

Tuesday, August 14, 2012

Glitters is Gold Eyeshadow look...

There's a lady who's sure All that glitters is gold....

Ok for some reason I did get Stairway stuck in my head doing this look. I know I know...I am a nerd and I love it. I am always reminded of songs when trying to name a look LOL.

So for this I used Kat Von D True Romance pigment in Conquer. When I bought it I thought it was more of a green color but I am loving this stunning gold shade. I used NYX glitter liquid eyeliner in silver on my top lids. On the bottom I used a soft crayon eyeliner in black. The Mascara is Rimmel Lash Accelerator.


Layering it up....

For this I used a layered polish I bought at Rue 21 for just 3.99! It was supposed to give a "marbled" look but as you can see that is not the effect it gave at all. However I am super happy with this polish. It has super fast dry times. I mean by the time I got to the pinky on my left hand the right thumb was already dry. I used a total of 3 coat and I would say for all 3 the dry time was maybe a total of 10-12 minutes. Then there was the look the effect did end up giving. I have this kind of layered look to my nails. Not what was promised but I love the way the color came out in the end. Beware this is not a super shiny finish! I loved the look of the more matte nail for this color but you may want to add a shiny top coat for that perfect finish!
This is the polish in the bottle...Beware it does say right on the bottle not to shake it before use!

Ciate Velvet Manicure Copycat

So here is my try for the "Velvet look" That Ciate is promoting on Sephora now. I used Julep Polish in Sasha. I applied 2 coats of that and allowed them to dry. I added a 3rd coat of the polish them IMMEDIATELY applied the flocking powder. I used Recollections Flocking powder in Carrot. They can be bought in the 6 pack as I bought or you can buy them individual. These should be available in most Micheal's hobby stores. I tried a few different ways to apply the powder including just trying to use the shaker top as well as trying to add a bunch to the brush and kinda sprinkle it on. In the end I just picked up the powder between two fingers and rubbed them together over the nail. Beware this was a messy process so I did this over a piece of paper. You do NOT want to apply a top coat to this as it will take away from the fuzzy look of the flocking powder. The "fuzzy" look stayed only a few days on the manicure but it still looked fine once is toned down a bit. To buy the kit with polish & powder on Sephora it is $19. I replicated this look with a polish I had in my stash and paid only 6.99 for 6 vials of different colored flocking powder. Now talk about a penny saved!
Here is the vial of flocking powder alone....


Taylor Swift Wonderstruck Enchanted perfume Freebie

Head over to the Taylor Swift facebook page. Click on the Wonderstruck tab to request this sample!


Saturday, August 11, 2012

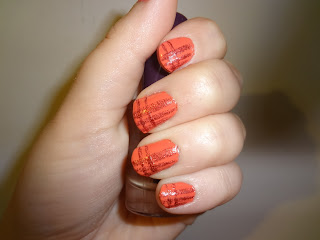
Mad for Plaid...

Ok so these didnt come out perfect but I did not like the polish I was using. 
I am really bummed cause the coral polish is Julep in Sasha. Now this is my first time using Julep polish and I know I am gonna get crucified for saying this but I did not like it. It smelled worse than most polishes to me. And my dry time was HORRENDOUS! 2 coats of polish took like 2 hours to dry it seems. And even then after going to bed for the night I ended up with indentations from my sheets. I am sooooo glad I got the set for the penny intro offer cause if I had paid full price I woulda been ticked! 
Anyway the glitter I used for the stripes is just a cheap no name polish pen I got a walgreens. I still love the idea but I think if I try it again I am gonna go with colors that contrast a lot more.
Here is what the Julep Sasha polish looks like alone....
It is too bad I didnt like the product cause I do love the color!

If you have any suggestions on nails you wanna see just let me know ;)